《1368个单词就够了》词汇表
下载链接如下:
今天要来学习迭代器模式, 猛地一看真的没什么内容. 但是翻开书(设计模式)之后, 发现事情没有那么简单!
迭代器模式主要:提供一种方法顺序访问一个聚合对象中的各个元素,而又不需要暴露该对象的内部表示。
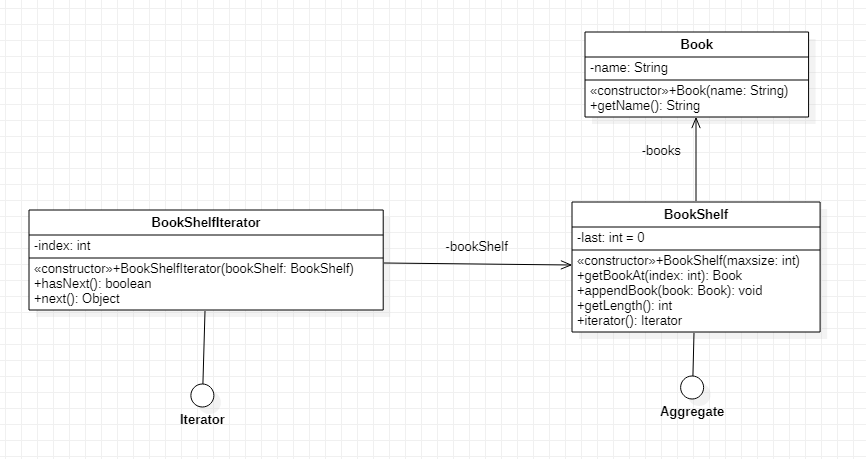
” 是否由使用者控制迭代 ? ” ,作为 ” 外部迭代器 ” 和 ” 内部迭代器 “的区分依据。外部迭代器:必须由使用者主动推进便利的不发,现实的向迭代器请求下一元素。而内部迭代器:则只需要想起提交一个待执行操作,迭代器将会对聚合内的每一个元素应用该操作。
迭代器 和 聚合 本身的都可以定义遍历算法。
聚合 中 定义遍历算法 :这种迭代器被称作 “游标(cursor)” ,以游标为参数调用该聚合的next操作.
迭代器 中定义遍历算法 : 容易在相同的聚合上使用不同的迭代算法; 也容易在不同的聚合上重用相同的算法. 但是遍历算法可能需要访问聚合的私有变量, 这样会破坏聚合的封装性.
健壮的迭代器, 保证插入和删除操作不会干扰遍历\不需要copy该聚合。
还是 “设计模式”中描述的内容比较详尽, “图解设计模式”确实比较浅显易懂, 想多了解一些就得换一本书了, 但是不得不说, 图多的就是比字多的容易看进入.
程序员的基本功之一“ 设计模式 ”,感觉曾经学了很多遍还是一知半解,每次都是重新学习的感觉,为了避免这种低效的学习,决定一次性的把设计模式学习透彻。
纸质书籍:图解设计模式、GOF的设计模式、Head First设计模式
–为什么叫Gof呢,我搜了一下百度是这么说的“ 《Design Patterns: Elements of Reusable Object-Oriented Software》(即后述《设计模式》一书),由 Erich Gamma、Richard Helm、Ralph Johnson 和 John Vlissides 合著(Addison-Wesley,1995)。这几位作者常被称为”四人组(Gang of Four)” ”
电子资料:极客时间的王争老师的专栏《设计模式之美》目前正在更新中未完结(页面最下方有专栏的链接,有兴趣可以看一下)。
根据目前的情况我市选择图解设计模式为主,设计模式和王争老师的课程为辅的进行交叉学习。
根据目前的书籍资料简单整理了一个脑图,随着我的学习进展会不断的更新这个脑图,随后会提供一个pdf版本的下载。
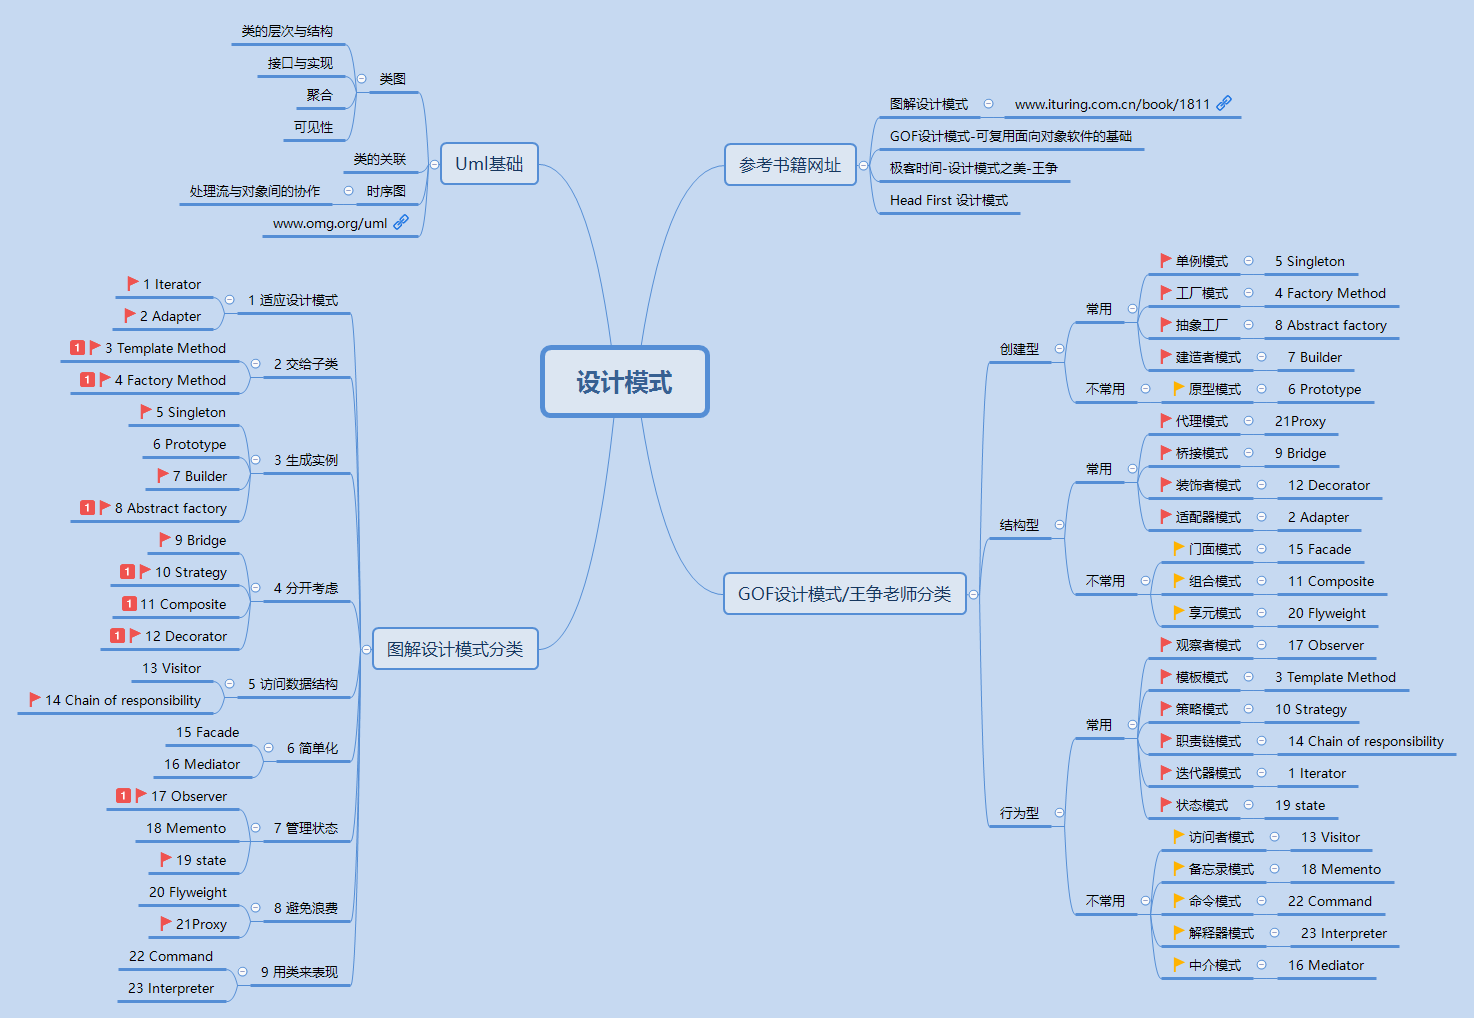
红色小旗子标注的是王争老师专栏里面介绍到的经常使用的设计模式,红色数字1标注的是Gof书籍中推荐新手刚入门的时候的优先学习建议。
我决定根据图解设计模式书中的目录顺序,优先学习红色小旗子的内容。应该14个红色的小旗子,还有一个只是红色的数字1 没有插旗子,一共15个,15天。
说到ETL 是英文Extract-Transform-Load的缩写 ,它是用来描述从数据源端抽取,对其进行转换,然后将数据加载到目标端的一些列过程。
很多系统之间都存在一定的批量数据的交互。然而一个好的ETL工具,在开发和使用维护上可以让我们事半功倍。
目前工作的原因用到的比较多的ETL工具就是Kettle(后期这个改名为pentaho data integration)。下载地址:https://community.hitachivantara.com/s/article/data-integration-kettle
目前最新版本pdi-ce-8.3.0.0-371(虽然页面上显示的是8.2 stable)
kettle 是水壶的意思, 很形象的拟物命名方式,让人感受到,把原料放在水壶里,料理完之后,再将数据倒入目标系统。其他的一些工具也是pan、 kitchen 可视化工具是spoon。
spoon允许通过图形界面来设计ETL转换( transformation )和任务(job)。
pan :批量调用运行transformation。 kitchen 也是一个后台运行的程序
kitchen:批量调用运行job。 kitchen 也是一个后台运行的程序。一般情况使用定时任务启动kitchen去运行job
kettle的文件类型分为两种kjb、ktr。
kjb:就是job,可以用来控制 transformation 的运行流程,可以顺序执行或者并发运行;或者脚本;或者设置变量;传输文件;运行shell等;
ktr:就是transform,转换。具体的数据处理步骤,一般情况包含一个input和一个output。在input和output之间可以执行各式各样的转换操作。
kettle解压之后,配置好与kettle版本匹配的jre环境就可以运行。linux、windows、macos有的还需要根据不同的发行版本,安装一下依赖环境。具体可以参照“ How to get PDI up and running ”,我已经把内容copy了出来。
How to get PDI up and running
Linux
Ubuntu 12.04 and later:
The libwebkitgtk package needs to be installed. This can be done by running apt-get install libwebkitgtk-1.0.0
Unzip the downloaded file. Run spoon.sh file, it should be under /data-integration.
On some installations of Ubuntu 14.04, Unity doesn’t display the menu bar. In order to fix that, spoon.sh has a setting to disable this integration, export UBUNTU_MENUPROXY=0 You can try to remove that setting if you wish to see if it works propery on your machine
CentOS 6 Desktop:
The libwebkitgtk package needs to be installed. This can be done by running yum install libwebkitgtk
Unzip the downloaded file and run spoon.sh, it should be under /data-integration.
Windows
After unzipping the downloaded file, you can launch Spoon by navigating to the folder /data-integration and double clicking Spoon.bat
If you are using Infobright, make sure to copy the following files to your Windows system path (for example %WINDIR%/System32/):
libswt/win32/infobright_jni_64bit.dll (Windows 64-bit)
libswt/win32/infobright_jni.dll (Windows 32-bit)
Rename the file to: infobright_jni.dll, then run Spoon.bat to launch Spoon.
Mac OS
After unzipping the downloaded file, you can launch Spoon by navigating to the folder /data-integration and double clicking on the “Data Integration” application icon.
解压目录下samples文件夹内:transformations、jobs、db里面分别有一些可以参考的例子。
后面我会再一步一步的介绍如何配置一个简单的transformation、job等内容。
1. Hadoop是干什么?
2. Hadoop主要组件及其生态圈
3. Hadoop的历史
参考资料:
1、Hadoop权威指南(第四版)